


Accessible Restorative Yoga Poses
Looking to add more yoga to your life without adding more work? Looking for something to help your body relax and mind de-stress? May we suggest you try some restorative yoga poses?
Restorative yoga is known to release muscular tension and deeply relax the body. This restful style of yoga can help still a busy mind and improve your body's ability to heal and balance itself. Practicing as little as 15 minutes of restorative yoga helps to balance the nervous system and boost the immune system.
With so many benefits of restorative yoga, what are you waiting for?
If you're not sure where to start with your home practice, we've listed some of our favourite and most accessible Restorative Yoga Poses below.
If you don't have the props shown in the photos, there are alternatives you can easily find in our own home. Use a rolled up towel in place of a bolster. Use books instead of yoga blocks. Try small pillows in place of Mini Round Bolsters or Knee Pillows. If you need more help with homemade yoga props, check out these two blog posts for more information on Prop Alternatives. Here and Here.
Our Favourite, Accessible Restorative Yoga Poses
SUPPORTED SAVASANA
Have a bolster or rolled up blanket beside you as you lay on your back. Place the bolster under your knees (closer to your thighs than calves) and allow your legs to be fully supported. Extend your arms to a comfortable distance, palms facing upwards. Elongate the back of your neck by slightly tucking your chin downward. Release your whole back body into the floor, bolster and whatever supports are beneath you.
Stay here for 5 - 20 minutes.
SUPPORTED SUPINE TWIST
Place a bolster or rolled up blanket lengthwise on your left side you as you lay on your back. Gently draw your right thigh towards your belly. Take a couple deep belly breaths here to relax your abdomen. Use your left hand to guide your right knee, calf and foot onto the bolster as you begin to twist. Try to keep your right shoulder blade touching the floor. If it doesn't, place a blanket or small pillow under your shoulder so that your body feels fully supported.
Close your eyes and relax into your natural rhythm of breath for 2 - 10 minutes.
LEGS UP THE WALL
One of my all-time favourite poses because you can do this almost anywhere, anytime. You can do it without props or try different props for lots of variations.
Find a spot next to a wall with some empty space. Sit with your right hip and shoulder touching or close to the wall. As you start to lay back, pivot the body so your bum is now touching or close to the wall as your back lays on the floor and your legs extend up the wall. Lets your arms extend a comfortable distance away from your torso with palms facing up. Elongate the back of your neck by slightly tucking your chin downward.
*If you're feeling a stretch in the back of the legs, move a little farther away from the wall or try bending your knees a bit. This should be a restful position. One that you can fully relax into and stay for 3 - 15 minutes.
SUPPORTED CHILDS POSE
Place a bolster or rolled up blanket on the floor. Take a wide kneeling stance and pull the short end of the bolster between your thighs. Keep your bum towards your heels as you extend your arms forward. Rest your hands and forearms on the floor and turn your head to one side so that your face and chest are supported by the bolster. Soften through your shoulders. Breath into your back body, allowing the ribcage to fully expand with each inhale and release with each exhale. Unclench your jaw and allow your body to give into the support of your bolster for 2 - 10 minutes.
*If your knees, ankles or hips don't love the depth of this pose shown above, try propping up your bolster on some blocks or books as shown in the photo below. Then follow the same steps as listed above.
Or you can add extra padding under the knees with some Knee Pillows.
Or place a rolled up towel between the claves and hamstrings or under the ankles.
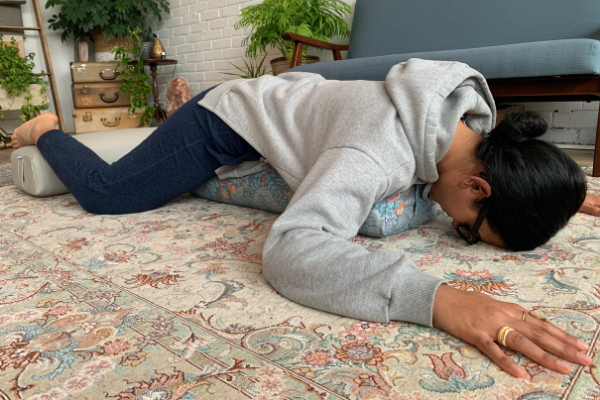
RESTORATIVE FROG POSE
This one isn't quite as easy as the other poses... but it feels sooooo good.
Place one bolster lengthwise on the floor. Place a second bolster width-wise on the floor approximately 1 - 2 feet away from the first bolster. Take a wide kneeling position with the tops of your ankles resting on the width-wise bolster. Then slowly extend your body and arms forward. Allow the front of the pelvis, belly and chest to rest on the lengthwise bolster. The top of the bolster shouldn't go past your clavicle bone. This gives you enough room to drop your forehead to the floor. Allow your forearms to rest on the floor, keeping elbows bent around 90 degrees. Allow your whole back body to soften as all the muscles around the spine and pelvis begin to release.
Stay here for 3 - 12 minutes.
*If there is strain on the back of the neck or shoulders, try adding a small pillow or towel under your forehead.
Below is another angle of the pose, to help you better understand how to set yourself up.
Remember, you don't need to have all the props at home. Check out our Prop Alternative Guides here.
There are so many restorative poses to support your wellness journey. We hope you're able to try and enjoy some of the ones we've listed above. If you have any questions about specific poses or props, please don't hesitate to reach out to us anytime.
Thank you for being here. Thank you for being you.
xo Shelley xo